Tips for the correct removal of tick heads

When removing a tick from a dog, it is not uncommon for the head to get stuck in the skin. This is annoying and many dog owners are worried that the risk of transmitting pathogens is high. However, a visit to the vet to remove every tick is impractical. We therefore explain how to remove ticks properly and independently so that, in the best case scenario, the head does not get stuck.

Search the dog's body properly

Ticks have an easy time hiding in a dog's thick fur. This makes it all the more difficult for dog owners to discover and remove ticks. It is therefore advisable to check your dog after every walk. The sooner you remove ticks, the lower the risk that they have already transmitted pathogens to your beloved four-legged friend. Additional attention should be paid to the areas on the dog's body where ticks prefer to attach themselves.

Favourite places where ticks like to bite

Ticks are particularly common on areas of the body that are not very hairy or are surrounded by delicate skin. Favourite areas are therefore
  • Head, especially eyes, ears and muzzle
  • Neck and shoulder
  • Chest and armpits
  • Inner thigh of the dog up to the belly
  • Flanks
Areas of the dog's body that are frequently infested by ticks: Head, ears, neck, armpits, stomach, legs and paws. 
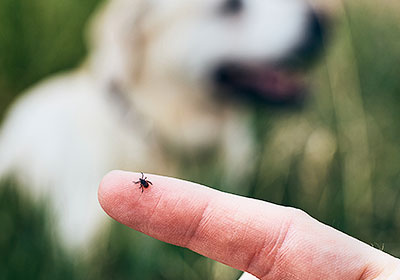
These body parts are usually infested with ticks

How the thorough check works to detect ticks

Start at the head and gently stroke your four-legged friend's coat. Try to feel for unevenness and visually inspect the areas at the same time. Scratching movements are particularly good for feeling densely furred areas on the dog's body. Work your way forward bit by bit until you have reached the tail of your furry friend. A brush or comb can be used as an aid, especially for four-legged friends with longer fur. This makes it easier to detect crawling ticks, which are usually difficult to feel due to their smaller body size. Incidentally, it is always worth taking a closer look, as adult ticks can also lay eggs. These can develop into larvae and then nymphs, which are particularly small and cannot be felt.
Life cycle of a tick: development from egg to larva and nymph to adult tick
Small, non-attached ticks are easy to remove and you can protect your four-legged friend from the transmission of pathogens. However, the situation is different if a tick has already attached itself. If you have discovered such a spot, make sure you have a suitable tool to hand. This is because, on the one hand, a stuck tick is more difficult to remove and, on the other hand, it may have been on the spot for some time and therefore already transmitted pathogens to the dog. To help you remove the tick without leaving any residue and avoid the tick's head getting stuck on the spot, we explain how best to remove the small parasites.
How to safely remove a tick from a dog using a suitable tool

4 steps for removing ticks: Example using the tick tweezers

Instructions for removing ticks

In preparation, you should have other utensils such as a gentle disinfectant spray, skin care and, if necessary, a comb and snacks ready as a reward. If your dog becomes nervous, it is advisable to ask a second trusted person for help to keep the dog calm. This will prevent you from accidentally injuring your four-legged friend.
Part the dog's fur with your fingers or a comb so that the tick is as free as possible. Try not to squeeze the parasite. This could cause the tick to vomit and release pathogens.
  1. Grasp the tick with the tick tweezers:
    Open the gripper of the tweezers and guide them vertically and as close as possible to the dog's skin and the tick. Close the tick tweezers without crushing the rear part of the body.
  2. Carefully remove the tick:
    Carefully pull the tick out vertically. Stubborn ticks can be loosened slightly better with minimal loosening movements from right to left.
  3. Dispose of the tick:
    Once you have successfully removed the tick, you should now dispose of it. The easiest way to do this is to place the parasite in kitchen paper and crush it with a solid object. As the tick body contains blood, it is advisable to do this outdoors. A bath in boiling water or high-proof alcohol is also effective. You can then dispose of the remains of the tick in the household waste.
  4. Disinfect:
    To prevent your four-legged friend from developing an infection at the site, disinfect it thoroughly and then wash your hands.
Four steps to safe tick removal: grab the tick with tick tweezers, carefully remove it, dispose of it and disinfect the area
You can then apply SkinClean+Care to the affected area to additionally cleanse and care for the skin and ensure that the protective and longer-lasting film prevents the penetration of pathogens and thus supports the skin's regeneration process.

SkinClean+Care Spray gel 100 ml

Spray gel for skin cleansing & care for dogs and cats

Spray gel for skin cleansing & care for dogs and cats

10,48 €
incl. tax, plus shipping costs
Base price: 104,80 €/l
Even if the tick has been completely removed, you should still observe the area for a few days. It is not always possible to see with the naked eye whether a small part of the body or the tick's head has become stuck. However, if signs of inflammation are visible, it is best to consult a vet who will examine the affected part of your dog's body.

Alternative aids to tick tweezers

The tick tweezers are shaped like a biro. The push button at the end opens a pair of pliers consisting of two jaws at the tip. This is used to grab the tick close to the skin and remove it. The tick tweezers are usually made of plastic.

Tick tweezers

Tick tweezers differ only slightly from tick tweezers in their use. They are usually made of metal and are closed by simply squeezing them together. This allows you to grasp ticks close to the dog's skin and pull them straight out, just like with tick tweezers.

Die Zeckenkarte The tick card

An alternative to tick tweezers and a practical tool for removing ticks is the tick card. It is usually the size of a cheque card and is therefore handy for when you are out and about as it fits in any wallet. The tick card has a slit-like notch that you use to grab the tick. To do this, guide the card along the dog's skin towards the parasite so that it slips into the notch and is clamped on the tick's head. If used correctly, the body will not be crushed. You can now use the card to pull the tick away from the dog's body and remove it.

Zeckenhaken und Zeckenschlinge Tick hook and tick snare

The so-called tick hook works in a similar way to the tick card. The hook-shaped tool also has a slit at the front end, which is used to remove the tick in the same way.
The tick loop, also known as a tick lasso, looks like a biro. There is a plastic loop at the tip, which is opened and closed using a push button. To remove ticks, place the open loop around the tick and guide the tip of the pen as close as possible to the parasite by applying light pressure to the skin. Slowly releasing the push button tightens the loop around the tick so that you can then loosen and remove it with one turn.
Tools for removing ticks: Tick tweezers, tick card, tick hook and tick snare 
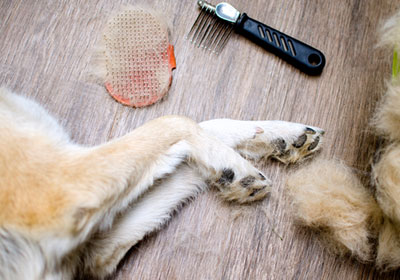
Other tools for removing ticks
If necessary, simple tweezers can also help or you can try to carefully remove the parasite with your fingers. However, to minimise the risk of the tick head remaining in the dog after removal, the tools mentioned above are more suitable. Because even with the special tools, it can happen that the tick cannot be completely removed and parts of the head or bite apparatus are still stuck in the dog.

Tick head stuck on a dog: What to do?

If part of the tick, such as the head, is stuck in the dog's skin, many dog owners are worried. Removing the complete and living tick has the decisive advantage that it does not vomit out of fear. Unfortunately, it usually does this when the body is separated from the head. If the tick is infected with pathogens, these will enter the dog's bloodstream when it vomits. However, the detached body can no longer transmit pathogens. If the tick's head is stuck, there is often an urge to remove the foreign body directly. As a rule, the dog's skin quickly manages to encapsulate and expel the foreign body on its own. Frantically scratching at the bite site where the tick head is still stuck could enlarge the small wound, favour the penetration of dirt and promote additional inflammation.

Then it's best to go to the vet!

Remains of ticks that are not repelled by the dog's skin and therefore remain there can cause inflammation. If the wound around the stuck tick head does not heal after a few days, it is recommended that you visit your vet urgently. You can also ask your trusted vet for help if you feel unsure about removing the tick or if you do not have a second person available to assist you.
Also observe your dog's behaviour and state of health over the coming weeks. Even if the area where the tick was attached has long since healed, non-specific symptoms caused by transmitted pathogens may not appear until weeks later. Some alarming symptoms can be
  • Fatigue
  • Loss of appetite
  • Fever
  • Swollen or painful joints
  • Increased sensitivity to pain
  • Changing lameness
Never delay a visit to the vet in the event of a change in behaviour and remember to inform the vet of a tick infestation - even if it was weeks or months ago. This will help to speed up the possible diagnosis and subsequent treatment.

Prevention is better than aftercare

Regular tick prophylaxis is extremely important, as ticks can transmit pathogens that can cause really dangerous diseases. At this point, it is advisable to get in touch with your trusted vet, who can give you tips and recommend preventative measures. In our guide article "Ticks in dogs - how to protect your dog properly", we explain which pathogens can be transmitted by ticks, provide information about the symptoms and show you which protective measures you can take for your dog. Because the possible transmission of pathogens can be significantly minimised by taking the right prophylactic measures.

Dog won't let tick be removed: 5 tips and tricks on how to do it anyway

Not every dog keeps still when removing ticks. Depending on where and how firmly the parasite is attached, the procedure can also be painful. With these 5 tips, you can still help even restless four-legged friends:
  1. Ask a second trusted person for help to calm and stabilise the dog
  2. Find a quiet place where your four-legged friend feels comfortable
  3. Be patient and calm the dog down by stroking it
  4. Distract your dog with his favourite snacks, such as our Fit-Bits, and reward him for staying calm
  5. After successfully removing the tick, praise and reward the dog again
If you still have problems removing the tick or if your dog snaps at you out of fear, it is also advisable to visit your trusted vet.

More articles on the subject "Health"

The benefits of PLATINUM dog food

  • PLATINUM uses a unique preparation method called FSG, which offers numerous advantages compared to conventional dog food.
  • Dog food prepared with FSG is gently cooked only in its own meat juice and is therefore nutrient-rich like BARF, excellent for building muscles and also extra tasty for your dog.
  • With at least 70% fresh meat in the dry dog food and 83% fresh meat or fresh fish in the wet dog food, PLATINUM places great value on a composition of the food that is adapted to the needs of dogs.
  • The declaration and composition of dog food prepared with FSG is tested regularly and independently by ELAB Analytik GmbH (formerly TÜV SÜD ELAB) — for canine health protection.
  • PLATINUM is generally very well accepted by dogs of all breeds and ages. Even four-legged friends with sensitive digestion or intolerances usually tolerate PLATINUM dog food well.
  • All products are free of soya, GMOs and gluten. In addition, no flavour enhancers, attractants, odourants or colourings are used.
  • Over 100,000 positive customer reviews at Trusted Shops speak for themselves!